Mold and mildew are not just unsightly—they can also pose serious health risks and compromise the structural integrity of your property. If you’ve noticed dark, fuzzy patches or musty odors on your walls, it’s time to take action before the problem worsens. One of the most efficient ways to tackle mold and mildew is by using a high-pressure cleaner. This powerful tool can remove stubborn buildup quickly and effectively, restoring your walls to their original condition.
Why Use a High Pressure Cleaner for Mold and Mildew?
High pressure cleaners, also known as pressure washers, are ideal for cleaning stubborn stains caused by mold and mildew. They work by spraying water at high velocity to remove dirt, grime, and biological growth from surfaces. Here’s why they are perfect for this job:
- Efficiency: A high pressure cleaner can clean large areas in a fraction of the time it would take with traditional methods.
- Thorough Cleaning: The high-pressure water stream easily penetrates porous surfaces like brick or concrete, effectively removing mold and mildew at its roots.
- Eco-Friendly Option: By relying primarily on water, pressure washers reduce the need for harsh chemicals.
- Versatility: They can be used on a variety of surfaces, including brick walls, concrete, wood, and siding.
Preparation: Safety First
Before you start pressure washing, it’s important to take a few precautions:
- Wear Protective Gear – Mold spores can be harmful when inhaled. Wear a face mask, gloves, and goggles to protect yourself.
- Check the Wall Surface – Some materials, like old or damaged brick and painted drywall, may not withstand high pressure. Test a small, inconspicuous area first.
- Use the Right Pressure Setting – High pressure can damage certain surfaces, so adjust the pressure according to the type of wall you’re cleaning.
- Cover Nearby Items – If working outdoors, cover plants, furniture, and electrical outlets to prevent damage.
Step-by-Step Guide to Cleaning Mold and Mildew Off Walls
Step 1: Pre-Treat the Surface
For the best results, pre-treat the affected area with a mold-killing solution. You can use a commercial mold remover or create a DIY solution by mixing:
- 1 part bleach
- 3 parts water
- A few drops of dish soap
Spray the solution onto the moldy surface and let it sit for 10-15 minutes to loosen the buildup.
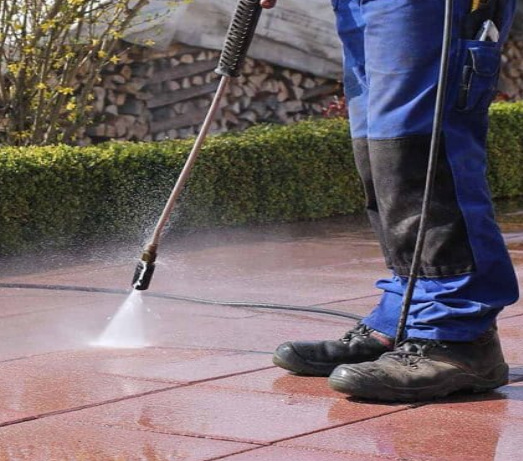
Step 2: Set Up Your High-Pressure Cleaner
Choose a pressure washer with at least 2000-3000 PSI for effective mold removal. Use a 25-degree or 40-degree nozzle for walls, as a more concentrated spray could damage the surface.
Step 3: Start Pressure Washing
- Stand at a safe distance (at least 2 feet away) and begin spraying from the top of the wall downwards to prevent streaking.
- Use sweeping motions to ensure even coverage and avoid focusing on one spot for too long.
- If mold persists, apply more cleaning solution and repeat the process.
Step 4: Rinse and Let Dry
Once the mold is removed, rinse the wall with clean water to eliminate any residual cleaner. Allow the wall to dry completely before painting or applying sealants.
Preventing Mold and Mildew Regrowth
To keep mold and mildew from returning, follow these preventive measures:
- Improve Ventilation – Ensure proper airflow by using fans, opening windows, or installing vents.
- Control Humidity – Use a dehumidifier to maintain indoor humidity levels below 50%.
- Apply Mold-Resistant Coating – Consider using anti-microbial paint or sealant on your walls.
- Regular Cleaning – Periodically wash walls with a mild detergent to prevent buildup.
Conclusion
Using a high-pressure cleaner to remove mold and mildew from walls is an effective and efficient cleaning method. By following the right techniques and taking preventive measures, you can maintain a clean and healthy environment in your home or commercial property. If the mold problem persists or covers a large area, consider seeking professional help to ensure safe and thorough removal.